


 Virgin Coconut Oil, Gold Label - 1 quart


Saturday, February 1, 2014


Tuesday, October 8, 2013
Arby's New Smokehouse Brisket Sandwich
This is a Sponsored post written by me on behalf of Arby's for SocialSpark. All opinions are 100% mine.
I love Arby's and find myself stopping by for a quick snack and sandwich fairly often. So when I saw the commercials showing the new Smokehouse Brisket sandwich, I was all over it. It looked incredible and had all the elements I like in a sandwich; good meat, soft bread, cheese, barbecue sauce and onion rings.

Only this isn't your typical sandwich... I think it's so much more. This is a delicious sandwich that starts with quality meat and is smoked low and slow for at least 13 hours and boy it sure tastes like it. We have a smoker at home and you can tell smoked meat vs. meat soaked with liquid smoke. This was for sure smoked for a long time and I love the flavor and aroma that I experienced. And the meat was flavorful and tender. No gristly fat on this sandwich! No way! The smoked gouda cheese adds an extra unique flavor to this sandwich and the barbecue sauce and mayo added was just enough that it did not leave the bread all soggy. I was also pleasantly surprised that the bun wasn't your typical sesame seed or plain bun you find these days but a soft bakery style bun that was delicious and didn't take away from the smoky sandwich flavor. Pair this with one of my Arby's favorites, curly fries, and I had a delicious and satisfying lunch on a chilly rainy day.
Can I also just say how much I love Arby's spokesman Bo Dietl? He's a "real" guy and not some flashy model and that is refreshing to see these days. I just had to throw that out there.
Is your mouth watering yet? Find an Arby’s near you and grab your own brisket sandwich. It's available as a single sandwich or you can have it in a combo with those yummy curly fries and a drink.
Tell me..... why are you excited to try the new Smokehouse Brisket? Leave a comment below and tell me if you've tried it or why you're excited to try it. I'd love to hear from you.

Thursday, September 26, 2013
Peach Mango Sorbet

Hey everyone! Summer isn't over
yet.... At least not for me. I purchased a KitchenAid ice cream maker
attachement with my mixer last month and I'm not ready to put it back in the
box. Hubby loves ice cream and sorbet and it's not just for the summer months
in my house. Today I am sharing a recipe for some delicious Peach Mango Sorbet.
This is perfectly refreshing for hot summer days and not so hot fall evenings.
Using this combination of fruits yielded a wonderful sorbet that you can either
devour for yourself or serve at your next barbecue.
Peach Mango Sorbet
2 cups frozen peach slices, thawed
1 fresh mango, cut into chunks
1/4 to 1/2 cup water
1 1/2 cups simple syrup (recipe
below)
Simple Syrup
2 cups water
2 cups sugar
2 cups sugar
Directions
Put peaches, mango and water into a
food processor and blend until very smooth. I used 1/4 cup water. If you wish,
strain the liquid in a mesh strainer pressing into it to get all the liquid out
and discard any solids. However, I like the texture of the solids in there so I
left them. It's up to you. Chill this mix for 4-6 hours in the fridge.
Meanwhile, make the simple syrup. Place the ingredients into a saucepan and heat through until sugar is completely dissolved. Place this in the fridge and chill completely, about 2 hours.
Meanwhile, make the simple syrup. Place the ingredients into a saucepan and heat through until sugar is completely dissolved. Place this in the fridge and chill completely, about 2 hours.
Once everything is chilled, add the
simple syrup to the peach mix. As you can see the recipe for the syrup makes
more then you need for this, so save some for your next batch!!
Bring out your ice cream maker and churn according to manufacturers directions. I have a Kitchen Aid Stand Mixer with the ice cream attachment. I churned it on setting #1 for almost 10 minutes until the texture was the way I wanted. I chilled this mix in the freezer for about 4 hours or until Hubby couldn't wait any longer. If you like a softer sorbet, chill for a shorter amount of time.

Thursday, September 19, 2013
Blueberry Chocolate Chip Cookies


1/2 cup butter
1/2 cup cream cheese
1/2 sugar (or Xylitol)
1 egg
2 Tablespoons Vanilla Extract (or Almond like my "error")
1 Tablespoon water
1-1/2 cup flour
1 teaspoon baking soda
1 teaspoon salt
1 cup blueberries
1/2 cup white chocolate chips
1/4 cup dark chocolate chips
Directions
Pre-heat the oven to 350 degrees

Since I was making this with two types of chocolate, I divided the mix into 1/3 and 2/3 dough mixes. In the large one, I added the white chocolate chips since hubby loves cookies more then me. I'm so nice to give him the 2/3 batch.


With the cream cheese, these came out more "cake like" then crunchy "cookie like." Don't get me wrong they were still very good and I love the mix of the tart dark chocolate with the blueberries. I think if I were to do these again (and I likely will), I would reduce the flour by about 1/8-1/4 cup to give them a bit more moisture, however these certainly were a winner in my household.

You can see the cake like texture in the center and boy were they fluffy!! Do you like yours crunchy or fluffy? Weigh in by commenting.

Tuesday, September 17, 2013
Fresh Whole Wheat Pizza Crust


This recipe is adapted from How Sweet Eats.
Whole Wheat Pizza Crust
1 1/2 cups whole wheat flour
1 teaspoon dry active yeast
1/4 teaspoon salt
1/2 cup lukewarm water
1 tablespoon olive oil
1 tablespoon honey
1 Tablespoon Italian seasoning
1 teaspoon garlic powder
Directions
Combine flour, salt and yeast in a large bowl. Add water, honey, oil, Italian seasoning and garlic powder, mixing with a spoon to form into a ball. Continue mixing with your hands and kneed for about 60 seconds. Lightly oil bowl and add dough back in. Cover and let rise for 2-3 hours.

Lay on lightly floured surface and roll very thin. Top with toppings and bake at 375 degrees for 30 minutes.
I just rolled out one pizza crust and it was a funky rectangular shape that reminded me of a map of the state of Illinois, lol. Hubby and I like different things on a pizza so we each topped our halves with something different.
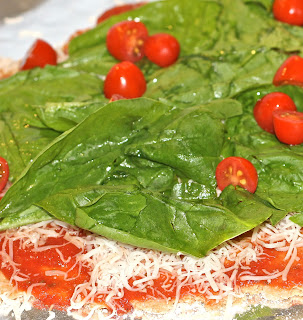 He had fresh spinach, cherry tomatoes, grilled chicken, mushrooms and mozzarella cheese with a drizzle of srirracha sauce.
 My half was vegetarian. I had fresh spinach, mushrooms, cherry tomatoes, mozzarella, capers and goat cheese.
 This was one delicious crust!! If you have a pizza stone, put it in the oven while you're pre-heating it so it's nice and hot. It will give you a nice crispy crust. This crust was so good and I love the honey that was added to it. Next time, I will use small chunks of fresh garlic in my crust so it has that burst of flavor in every bite. Hubby loved his toppings but I think mine were better.

I just rolled out one pizza crust and it was a funky rectangular shape that reminded me of a map of the state of Illinois, lol. Hubby and I like different things on a pizza so we each topped our halves with something different.


What are your favorite toppings? Mine would be mushrooms, olives, spinach and goat cheese. I prefer a veggie pizza but a nice pepperoni works too!
Saturday, August 31, 2013
Designer Inspired Handbag Giveaway!!!

Welcome to the Designer Inspired Handbag Giveaway event, sponsored by BagInc and hosted by Happy Mothering! During this event, Baginc.com will be giving away a handbag of the winner’s choice from their Hottest Collection (valued at up to a $190)!
Remotely operating from Paris with an office and warehouse in Hong Kong, Baginc.com is comprised of a team of energetic fashion aficionados with a passion for celebrity-inspired, designer handbags. Their international coverage gives Baginc a unique edge, one that allows them to deliver the hottest bags to clients all over the globe.
They have a great selection of designer-inspired handbag styles at affordable prices. They don’t charge sales tax and provide free worldwide shipping for all orders over $100. They even offer a money-back guarantee for customers who are unsatisfied with their purchase.
Here are are some of the many bags you’ll be able to choose from if you win!


You can never have too many handbags right? I love the selection here and it would be tough to just pick one!! I'm so excited to be part of this giveaway!
Good luck to all who enter.
Entering is easy. Just complete as many options as you’d like from the Rafflecopter form below. The more entries you complete, the more chances you’ll have to win – good luck!
This giveaway is open worldwide and runs through September 30, 2013.
Lori's Culinary Creations was not compensated for this post and is not responsible for prize fulfillment.
Thursday, August 29, 2013
Mom's Baked Hot Dogs with Beans

When I was a kid, my mom would make hot dogs for my sister and I. It wasn't just a dog in a bun, but it was cheesy baked dogs with pork and beans. My sister and I loved this and requested this often. She would cut the dogs down the middle and insert ooey gooey cheddar cheese which would melt and be so good when cooked. It's a traditional "mom dish" that we make when we grew up for our own kids, nieces and nephews. I loved it so much I wanted to share it with you so you can make this kid friendly delicious dish at home. I did modify mom's recipe a bit by adding bacon and brown sugar.
Ingredients
1 large can of pork & beans or baked beans
4 strips of bacon cooked and chopped
3 Tablespoons dark brown sugar
4 all beef hot dogs
4 ounces of cheddar cheese
Directions
Preheat oven to 350 degrees
Mix the beans, bacon and brown sugar and place in a glass baking dish.

Slice each hot dog down the center, but not all the way through.

Insert an equal amount of cheese in each dog

Place the dogs in the baking dish on top of the beans


Wednesday, August 28, 2013
Tortilla Roll-Ups {Guest Post}
Hello readers!! Today I am headed into surgery and will be down for a week or so. No worries, nothing serious, just something I need to do. In the meantime, some of my bloggy friends are taking over and telling you about their adventures in the kitchen. Awesome right? I can't wait to try these recipes myself when I'm back to normal again. So sit back, relax and enjoy these guest posts.
Today my friend Kathleen from Fearlessly Creative Mamma is sharing her Tortilla Roll-Ups. They look amazing!
_____________________________________________________________________________________________
Hi! My name is Kathleen and I blog over at Fearlessly Creative Mammas with my oldest daughter Samantha. We blog about all of our creative endeavors like recipes, crafts, parties or just tips that we have tried and liked. We love to spend time together as a family, cook, craft and travel. We hope you will stop by and visit sometime! I'd like to thank Lori for having me on her site today and I hope you will love what I'm going to tell you about today.
My father-in-law loves tortilla roll ups. I usually make him a batch for Father's Day and for his birthday, plus I make them when we have big family gatherings. We happened to have a big family gathering a few weeks ago and I thought I would share the recipe for Tortilla Roll Ups with you today. They are super easy and everyone always loves them.
First you mix the sour cream and cream cheese together until there are no lumps. I like to do this in my mixer because otherwise you are mixing all day long. I don't have that kind of patience.
Next you add the taco seasoning and mix it well.
Then you add the rest of the ingredients, except the tortillas, and make sure everything is mixed up really, really well.

Now you take your mixture and spread some on your first tortilla, all the way to the edge. Then you roll it up. Repeat until all of mixture is used.

My husband eats gluten free, so I made two of these with gluten free tortillas and rolled and wrapped them up separately.
Put them all in a container and refrigerate until they are firm. I usually make mine the day before we need them and refrigerate them overnight.

When you are ready to eat them, slice them up and serve. Then watch them disappear! They are so good and your friends and family with absolutely love them!
Here is the recipe:
Tortilla Roll Ups
1 package of large flour tortillas (about 16)
1 cup grated cheddar cheese
1 package taco seasoning
1 small can chopped black olives
1 small can chopped green chilies
8 ounces cream cheese, softened
24 ounces sour cream
In a large bowl, mix the cream cheese and sour cream until it is smooth and there are no lumps. Add the taco seasoning and mix well. Add the cheese, olives and chilies and mix. Spread the mixture on the tortillas to the edges and roll up. Store in the refrigerator until firm. Cut up and serve.

Tuesday, August 27, 2013
Easy Southwest Shrimp Cakes

Ingredients
1 teaspoon shallot, chopped fine
1 teaspoon shallot, chopped fine
2 eggs, beaten
Crushed red pepper to taste
Salt & pepper to taste
½ teaspoon parsley
¾ cup panko crumbs
Juice of 1 lime
Cooking spray
Directions
Preheat the oven to 350 degrees


Monday, August 26, 2013
Sweet Onion Salmon

Sweet
Onion Grilled Salmon
Ingredients - Serves 4
3
medium sized sweet onions, peeled
2
Tablespoons coconut oil
3
cloves garlic, crushed
2
Tablespoons butter
1 cup
crisp light white wine
2
Tablespoons dark brown sugar
2
Tablespoons sweet honey mustard
1/3 cup
honey
Salt
& pepper to taste
1.5 – 2
pound salmon fillet (I used half of the large fresh salmon from Costco)
Directions
Slice
the onions into rings on a mandolin set to thin cut. If you don’t have a
mandolin, slice as thin as you can with a regular knife.
In a
deep saucepan, heat the oil. Add the butter and garlic. Add the wine and cook
the onions down until they are translucent. Add the brown sugar, mustard and
honey and stir until blended. Salt and Pepper to taste. Turn to low heat and
simmer about 15 minutes.


Seal in
foil and cook on the grill over medium heat 15-20 minutes depending on the
thickness of the fish. Use the excess onion mix as additional garnish for your
fish.

Sunday, August 25, 2013
#MeatlessMonday: Fresh Beet & Goat Cheese Salad w/Lime Mango Dressing

This recipe for roasted beets with goat cheese on greens was inspired by a salad I had at Cat Cora's Kitchen at the Salt Lake Airport. I just fell in love with the mix of flavor and texture so I set out to duplicate it... or come close to duplicating it.
Ingredients for the Salad
3 beets cut to bite sized pieces, roasted (recipe follows)
1/2 cup sliced almonds, toasted
6 cups Spring Green Lettuce Mix
1/2 cup fresh blueberries
3 ounces goat cheese
To roast the beets:
Preheat the oven to 375°. In an 8-inch square nonreactive baking dish, toss the beets with the garlic, lemon juice, lemon zest, oil, and sugar. Season with salt and pepper and spread the beets in a single layer. Spray an 8-inch piece of parchment paper lightly with olive oil cooking spray and set it oiled-side down on the beets. Cover tightly with foil and roast, shaking the pan occasionally, for about 40 minutes, until the beets are tender. Chill for an hour in the fridge. You can do this a day ahead if you like.

To toast the almonds:
Put 1 Tablespoon coconut oil in a small saucepan and heat to medium heat. Add the almonds and toast until the almonds are a darker brown and you get a nice aroma of almond. Set aside.
Ingredients for the Dressing1 fresh mango, chopped
juice from 2 medium limes
1 teaspoon olive oil
1 clove garlic, minced
1/2 teaspoon crushed red pepper flakes (or more if you like the heat)
1/8 cup fresh cilantro leaves, chopped
Directions
For the dressing, place all ingredients in a food processor and blend until smooth, but still slightly thick. You do not want this really runny and the mango should keep it at a thicker consistency. Chill in the refrigerator at least two hours.


Subscribe to:
Posts (Atom)


